Learning Path Management

Learning Paths are a simple collection of courses with their own style, content, and URL. 

Feature Overview and Requirements

A Learning Path in the LMS is a branded, dedicated page  of courses that the LMS administrator has grouped in a manner that can be presented to learners – all of them or restricted to certain catalogs, organizations, or position groups. These learning paths are a customized, focused view into the Course Catalog and are not themselves related to accreditations, goal assignments, or auto-enrollment features. They can be displayed and learners can enroll in courses from the learning path, but the path itself cannot be assigned as a goal or added to an accreditation.

Learning Paths for organizations and position groups can be set up with unique styles, courses listings, and have their own URL for linking in other places within the LMS, set as landing pages, or linked externally.  

The image below, using custom HTML, is just one example of how you can use Learning Paths to present training options to your learners.

Step by Step Procedure and Field Description

Add a Learning Path

  1. From the Administration menu, select Learning Path. The resulting page lists any existing Learning Paths with various options for maintaining them.
  2. Click + Add Learning Path in the upper right corner.
  1. On the resulting slide-in, fill out fields on the General tab as described below. 
    Other tabs will appear dynamically for entry based on the Learning Path Type selected.
    1. Name: Enter the name of the Learning Path as it will appear in the Learning Path List and in the course catalog.
    2. Code: Enter a Code for the Learning Path as it will appear in the Learning Path List and in the course catalog.
    3. Learning Path Type: This determines how the Learning Path will be structured. Details on these options are in separate sections below.
      HTML Content Only: Uses an HTML file you design to display the learning path. It can be an existing file, or a file you create while setting up the learning path.
      Static Course List: Sets a static list of courses in the Learning Path.
      Dynamic Course List: Allows the content of the Learning Path to automatically change based on a query you set up to include courses which meet certain criteria. Courses that are updated and no longer meet the criteria will no longer appear in the path.
      Static Learning Path List: Allows you to create a static list of existing Learning Paths to be children of this upper level Learning Path.
    4. Catalog Organizations: Select the organizations (Business Units) that should have access to the Learning Path.
    5. HTML File: Click Select HTML File to identify which file should be used in the Learning Path. 
      In the resulting list, you can select from a file you’ve already prepared or click +Create New HTML file to create a new HTML file named after the Learning Path. It’s created using the standard learning path template file, but you can modify it under Site Management > Edit HTML anytime after.
    6. Image: Select an image to include in the Learning path.
    7. Include in Catalog: Enable the check box to include the Learning Path in the Course Catalog under Course Search.
    8. Active: Enable the check box to activate the Learning Path and make it available to learners in the system.

Learning Path Types

Expand these sections to learn how to set up different Learning Path types.

HTML Content Only

This option requires you to select an HTML file that you have already prepared for use in the Learning path or allows you to create a new path-specific file that can be modified after the learning path is established.

  1. To add a new HTML file with the same name as the Learning Path, click +Create New HTML File.
  2. The new file displays in the list and has the same name as the Learning Path you are working on.
    It will be based on the default learning_path.template HTML file. You can edit it anytime under Site Management > Edit HTML.

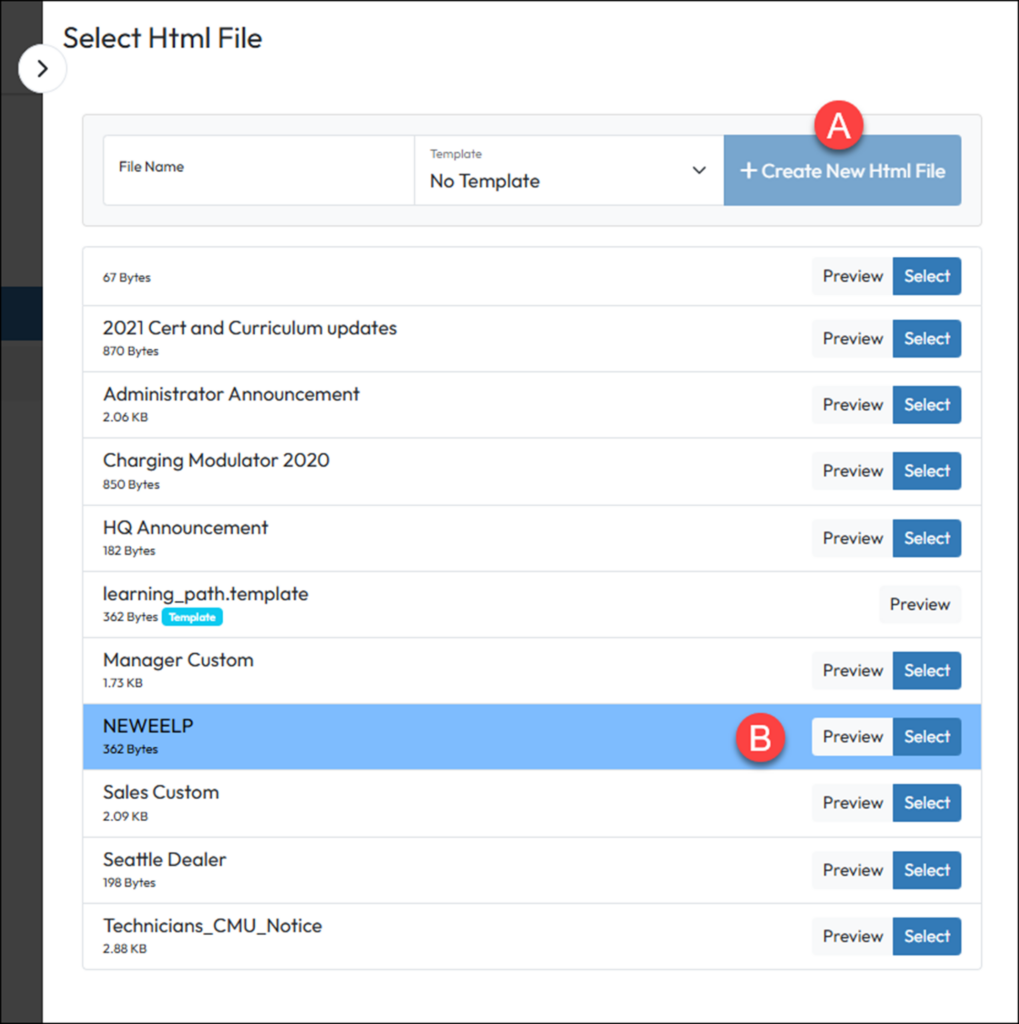
By default, if no new HTML has been created prior to or during this process, the default HTM will be Learning_path.template.

Static Course List

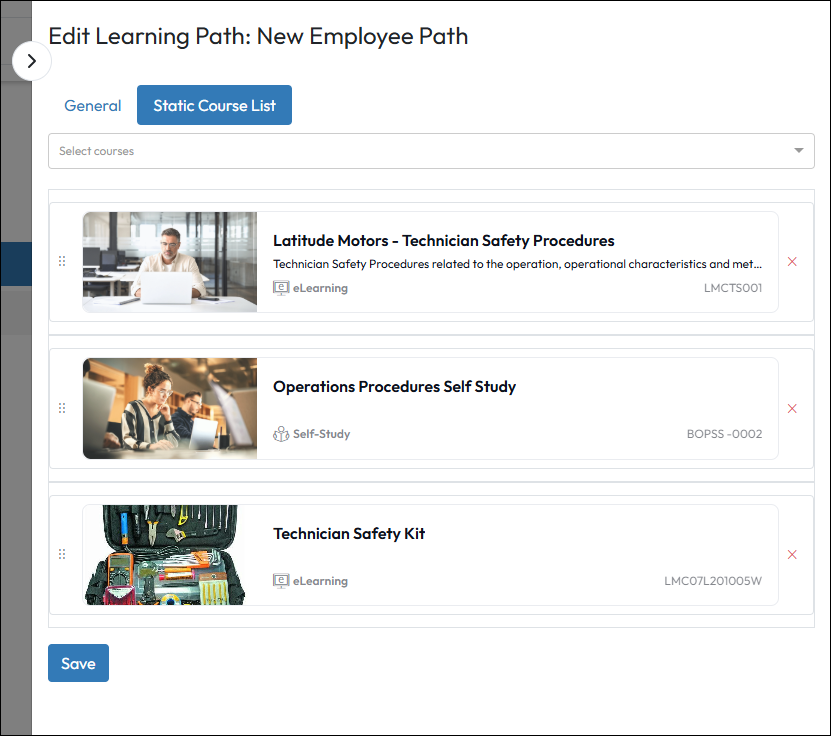
This option creates a static list of courses that can be augmented with customizable HTML content at the top of the page. If you select Learning Path Type “Static Course List”, a new Static Course List tab opens next to the General tab on the slide-in.

  1. From the Static Course List tab, use the type-ahead Select Courses field to search for and find courses by name or course code.
  2. Select the course from the type-ahead list and repeat as needed for additional Courses.
  3. Use the drag handle (6 dots) to the left of a course in the list to move it up or down.
  4. Click Save.

Dynamic Course List

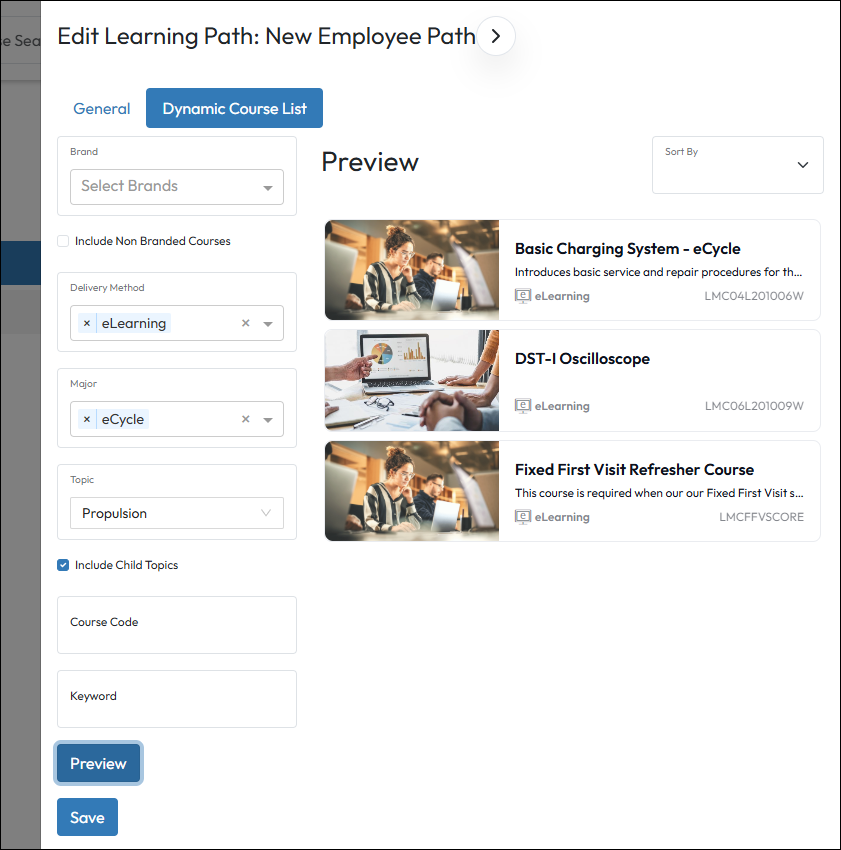
This option creates a dynamic list of courses that can be augmented with customizable HTML content at the top of the page. If you select Learning Path Type “Dynamic Course List”, a new Dynamic Course List tab opens next to the General tab on the slide-in.

  1. From the Dynamic Course List tab, use the type-ahead use the filters shown to create a query to always find the types of courses you want to be in the Learning path if they meet the criteria.  If a course is deactivated or falls out of the criteria in any way, it automatically removes from the Learning Path. Likewise, other courses that are updated and now meet the criteria could automatically be added to the path.
  2. Click Preview to load a list of courses that meet the criteria. Make changes in the filters as needed to fine tune the current results. When editing this path or looking at the slide-in in the future, it may be necessary to periodically use the Preview button to refresh results.
  3. Use the Sort by option to select how the list should be sorted on the Learning Path.
  4. Click Save.

Note: When viewing the Learning Path as a learner, it displays much like the Static Course List version. The primary difference is that the contents of the path can dynamically change based on which courses meet or fail to meet the criteria established.

Static Learning Path List

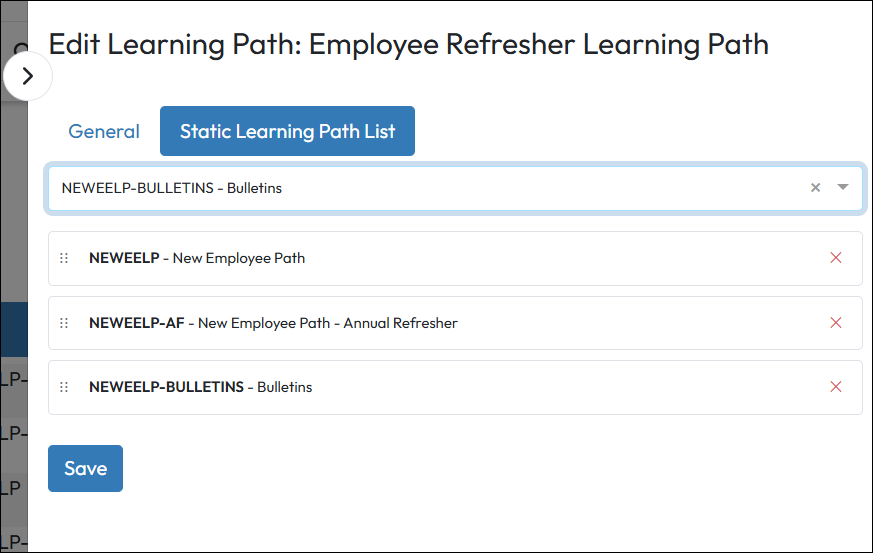
This option creates a static list of other Learning Paths that can be augmented with customizable HTML content at the top of the page. If you select Learning Path Type “Static Learning Path List”, a new Static Learning Path List tab opens next to the General tab on the slide-in.

  1. From the Static Learning Path List tab, use the type-ahead Select Learning Paths field to search for and find existing Learning Paths.
  2. Select the Learning Paths from the type-ahead list and repeat as needed to add additional Learning Paths.
  3. Use the drag handle (6 dots) to the left of an entry in the list to move it up or down.
  4. Click Save.

Include Learning Paths in the Course Catalog

If you chose to make Learning paths available from the Course Catalog during creation, you can set up how users can filter for them in Course Search.

  1. Cick the edit button (A, above) on the Course Search option. This will define how Learning Paths are filtered in the catalog.
  1. On the resulting slide-in, check the settings for Learning Path:
    Checked/Unchecked: Toggle determines if, by default, the Types filter in Course Search includes Learning Paths or not.
    Show/Hide: Toggle determines if Learning Paths appear as a search filter at all. “Hide” means the option will not appear for anyone in Course Search.
  2. Click Save.

Manage Existing Learning Paths

To modify an existing Learning Path, use the features highlighted on the image below.

  • Show Inactive: Enable to have the Learning Path List include any paths that have previously been inactivated.
  • Action – Edit Learning Path: Click to access the Learning Path details slide-in to modify as needed.
  • Action – Copy a Link to the Learning Path to the Clipboard: Capture the URL of the Learning Path to use as a link in other places in the LMS or externally (must log in to view).
  • View Learning Path: Displays the selected Learning Path as it appears to learners.

Options for Displaying Learning Paths

The most prominent way to display Learning Paths to learners is to use them as a Login Landing Page or the Home page … either for the entire portal or customized by organization or position group. Less prominent options include simply allowing learners to find them in the course catalog during Course Search or by seeing them on their My Learning page in a dedicated channel. 

The Overall LMS Landing Page or Home Page

To display a common Learning Path as the default LMS Login Landing page and/or Home Page:

  1. On the Administration menu > Site Management > LMS Information page under LMS Configuration, select the desired Learning Path page for the Login Landing Page, Home Page, or both.
  2. Click Save.

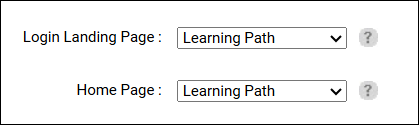
This becomes the default for all users UNLESS they are subject to further customization by Organization or Position Group branding.  In situations where multiple branding levels are involved, what users see is based on this hierarchy:  LMS Information Default is superseded by Organizational branding and both are superseded by Position Group branding.

Branding Organizations and Position Groups

You can use a organizational or position group branding to provide specific learning paths by organization or by the positions people hold. If you have Learning Path enabled in your portal, the default learning path for the portal is displayed under Administration > Site Management > LMS Information in the Branding section.

<None> in the display stands for the default. A drop-down list allows the selection of other learning path pages.

To assign a special Learning Path to an organization:

  1. Use Organizations > Search Organizations to find and edit the organization.
  2. On the Branding tab of the organization, find the Learning Path selection at the bottom and choose the file that is relevant to this organization.
  3. Click Submit.

To assign a special Learning Path to an Position Group:

  1. Use Organizations > Search Position Groups to find and edit the group.
  2. In the Branding section of the group, find the Learning Path selection at the bottom and choose the file that is relevant to this group.
  3. Click Submit.

My Learning Page

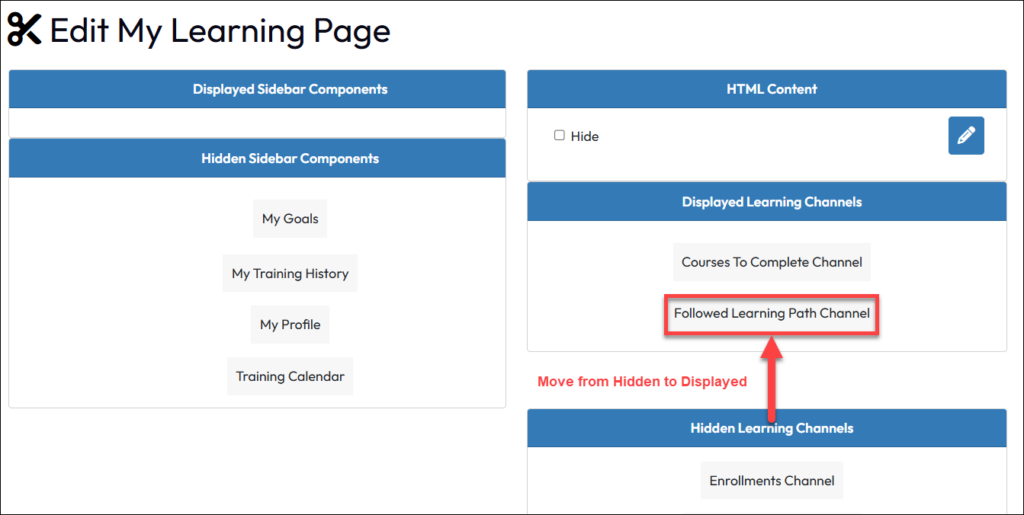
To display Learning Paths that users are following on My Learning Page, a couple of steps are required.

  1. On the Administration menu > Site Management > Edit My Learning, move the “Followed Learning Path” channel from Hidden to Displayed, then click Save.
  2. When a learner wants to follow a Learning Path, they can activate the Follow flag in the upper right  corner of the path. It turns solid after following. It will then appear on their My Learning page under Followed Learning Path Channel.

Find Learning Paths Using Course Search

If the Learning Path is set to display in the catalog, you can use Course Search to find a learning path or filter for it using the Filter Options.

  1. Place your cursor in the course search box in the header and press Enter, or select Course Search from the Navigation Menu.
  2. Click the Filter button.
  3. Under Types, select Learning Path to limit results to that type.
  4. Click Apply. The learning paths made available to course search will appear if other filters don’t exclude them.

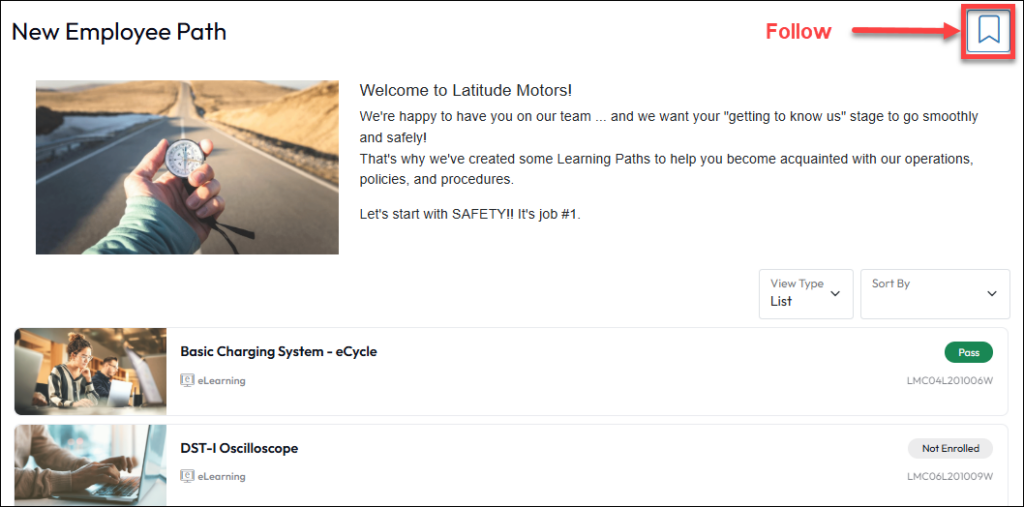
When they click on the Learning Path tile, it opens the path and they can follow it, view it, or move forward and enroll in one or more courses.

Access to Learning Path via URL

Learning Paths each have their own unique URL, which can be used inside the LMS to point to a learning path by linking it to text or objects in custom HTML.

The URL can also be shared outside of the LMS in emails, web pages, and other communications. People using the URL will land on the relevant Learning Path after they authenticate into the system.

Find the URL from the Learning Path administration page or from the browser URL bar while you are viewing the target Learning Path from the learner perspective, as shown in the images below.