Establish Brands For Content

Customers with product brands that may require different learning programs and assignment rules can set up those brands on Courses and Organizations to facilitate targeted assignment of coursework and accreditations.

Feature Overview and Requirements

Many of our customers have product lines – often known as “brands” – which play a great role in how they build learning experiences, assign content to employees, and require documented certifications and skills to be able to do their jobs.

For organizations in this situation, Latitude offers the ability to set up a list of your Brands, add Brands to the locations that specifically make, sell, or service them, and add Brands to courses whose subject matter is relevant to those brands.

In addition to helping search for locations and courses relevant to the brand, Brands can also determine how accreditations are assigned and how course search results are limited.

This page covers how to set up the brand list, how to assign it on a Course or a Location, and where Brand makes an optional appearance in other parts of the LMS.

Brands versus Branding

These two terms are very different, but can be casually confused. 

Brands represent specific products or services offered by an organization that may impact how training is configured, assigned, and required.

Branding is the feature that lets a portal administrator customize visual elements in the LMS to provide a familiar user experience to all or some LMS users. This can include logos, HTML content blocks, stylesheet elements, and more which can be updated to give a user experience that is portal wide, or even customized to the position group or organization level. Latitude now refers to Branding as the User Experience with its own page, although organizations and position groups retain legacy references to Branding.

Step by Step Procedure and Field Description

Manage a List of Brands

Enable the Use of Brands in the LMS

By default, Brands are hidden from view and must be activated in the Portal Information settings before establishing the Brands list:

  1. From the Administration menu Site Management section, select Portal Information.
  2. In the LMS Configuration section of the page, scroll to find the option Brands and enable it by checking the box.
  3. Click Submit.
Add New or Edit Existing Brands
  1. From the Administration menu Organizations section, select Brands.
  2. From the Search Brands page, click +Brand in the upper right corner to add a new Brand. 
    Note: To search for existing brands to edit, use the Code or Name fields and click Search or leave blank to see all brands. These steps focus on adding new brands.
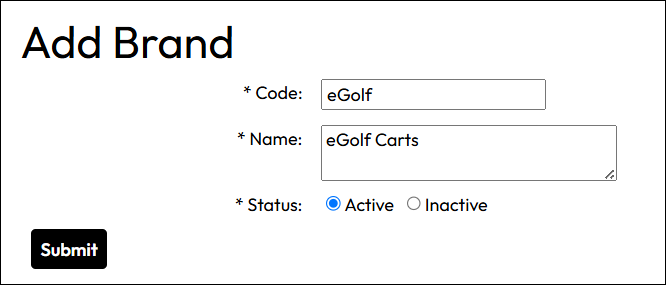
  3. On the Add Brand page, provide information for the following fields:
    • Code: Enter a brief, unique code to represent the brand name. 
    • Name: Enter a Name for the brand. This will be what appears in the selection list on locations and courses.
    • Status: Select whether the Brand is currently Active or Inactive.
  4. Click Submit.

  5. Repeat as needed to establish all necessary brands.

Note: Once established, edit brands by returning to the Administration menu > Organizations section. Instead of adding a brand, search for the existing one and click the code to open a page for editing.

Add Brands to a Location

Brands are only applicable to Locations, not higher level organizations.

To associate Brands with a Location:
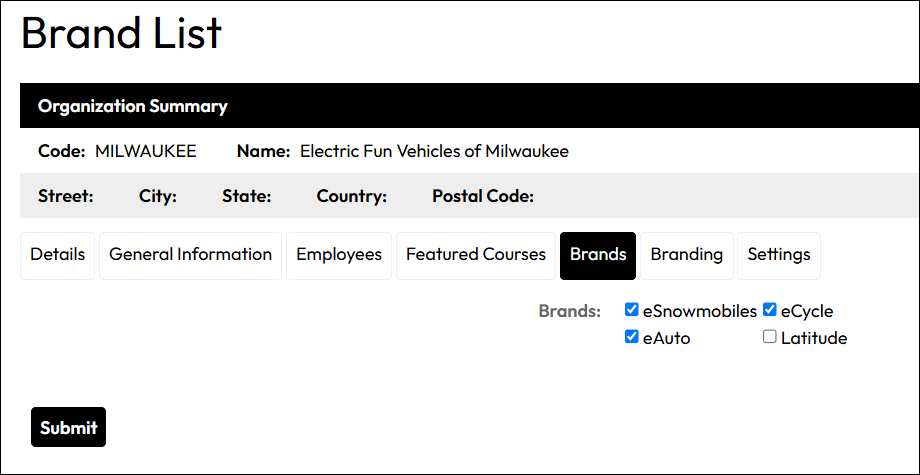
  1. From the Administration menu Organizations section, select Organizations.
  2. Search and select the Location which you want to update with Brands.
  3. From the Organization Details page, select the Brands tab.
  4. From the available Brands shown, enable them for the location by checking the box next to the name.
  5. Click Submit

Add Brands to a Course

Courses can be associated with any number of Brands.

To associate Brands to a course:
  1. From the Administration menu Catalog section, select Courses.
  2. Search and select the Course which you want to update with Brands.
  3. On the course General tab, scroll to and expand the Additional Information section.
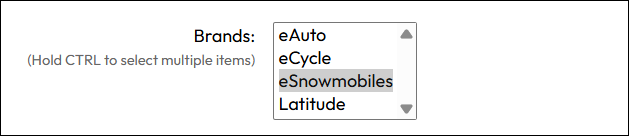
  4. Scroll to the Brands field. Select one brand by clicking on it or hold CTRL to select multiple brands.
  5. Click Save Course.

Note: if you have a lot of brands and find it difficult to see in one place which ones are associated with a particular course, you can click on the Details tab and scroll to see all the relevant Brands listed.

Use Brands to Restrict Catalog Search

You can enable a setting which limits users to catalog search results which have brands that are relevant to their location. Courses without brand designations can be also seen by users who belong to the course’s owner organizations. Brands must be enabled prior to seeing this setting.

To enable Restrict Course Search By User’s Location Brands:

  1. From the Administration menu Site Management section, select Portal Information.
  2. In the LMS Configuration section of the page, scroll to find the option Restrict Course Search By User’s Location Brands and enable it by checking the box.
  3. Click Submit.

Using Brands on Accreditations

Use Brands on Accreditations to fine-tune which locations are relevant to the accreditation assignment and which courses in the accreditation are required by users for accreditation achievement. 

Details on building an accreditation are found on the Set Up an Accreditation: Certification and Set Up an Accreditation: Curriculum pages. Below we identify how to find the specific Brands setting.

To associate brands with an Accreditation:
  1. From the Administration menu Accreditation section, select Accreditations.
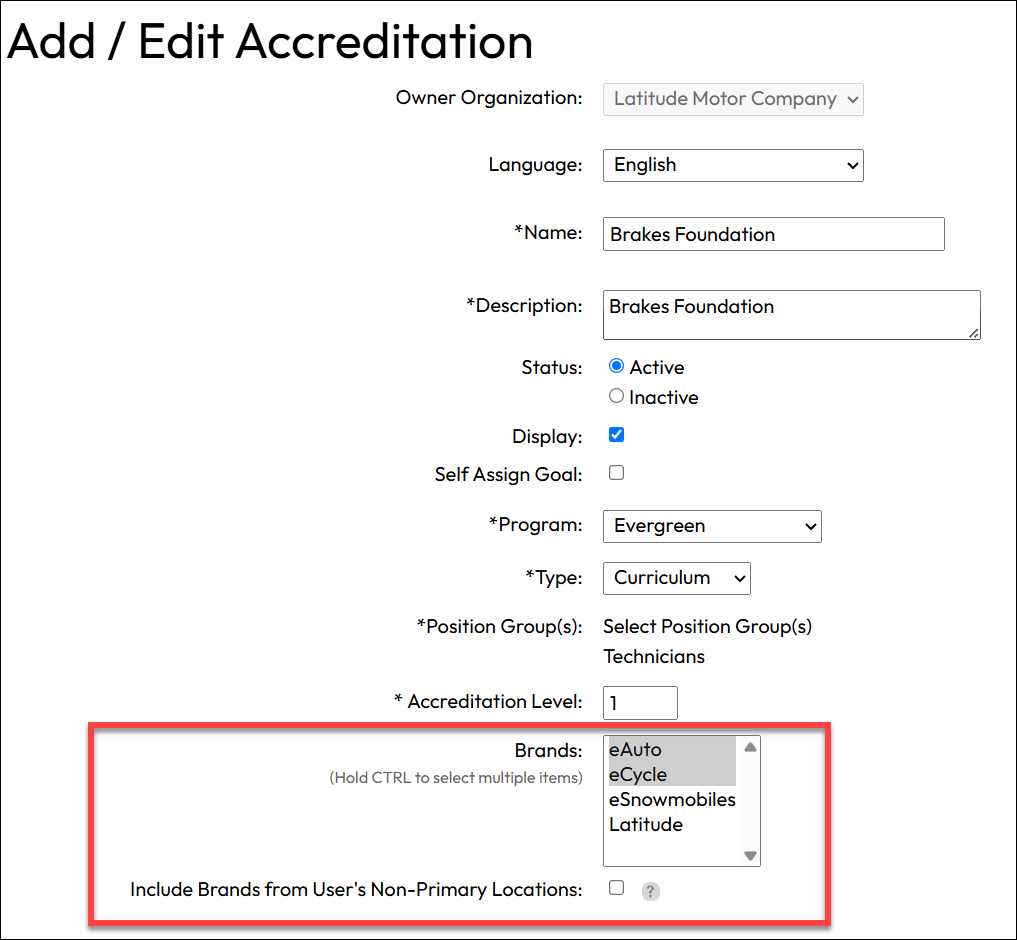
  2. A. For a new Accreditation, after you click +Accreditation, the Brands field is on the main Add page. Select the Brand that is relevant to the accreditation or hold CTRL to select multiple Brands. 
    B. For an existing Accreditation, search for and edit the accreditation and select the brands in the same manner.
  3. Include Brands from User’s Non-Primary Location: This additional, optional setting is available for brand-related accreditations. If enabled, users can achieve an accreditation for brands they are associated with at non-primary location profiles IF they belong to the same position group in both the primary and non-primary profile.
  4. Click Save to save any changes you made.