Manage the Learning Assistant Chatbot

Portal administrators can include/exclude portal course and resource content to be used by the Latitude AI Learning Assistant chatbot, a feature they can enable to help their learners find learning content.

Feature Overview and Requirements

The Learning Assistant is an AI-driven chatbot which can learn from your courses and resources to help your users get questions answered about the included content. Portal Administrators can decide which content to include or exclude from what the Learning Assistant uses to respond to your learners. This information will help you manage and teach your AI Learning Assistant. The only content accessible to the AI chatbot is that which you have purposefully vetted and included. It does not reach outside the bounds of your organization’s LatitudeLearning LMS.

Content Indexing

Indexing means compiling information and making it readily available for finding it later.  The content you select for indexing and training the chatbot varies in detail by the content type:
  • Courses: Only searches and indexes the content in the course code, course name, and course description. It does not index the course content, making it important to include good information in your course description for courses you want to include in the Learning Assistant’s repertoire.
  • Resources: In addition to the resource name, the content inside the resource for files and pages is scanned and included in the index. The content targeted by link-style resources is not scanned for indexing.
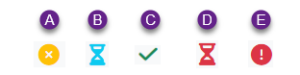
Indexing Status Key

  1. Not indexed
  2. Pending Indexing
  3. Index Complete
  4. Pending Index Removal
  5. Failed Indexing

Step by Step Procedure and Field Description

Content Source Tab

Filtering the Content List

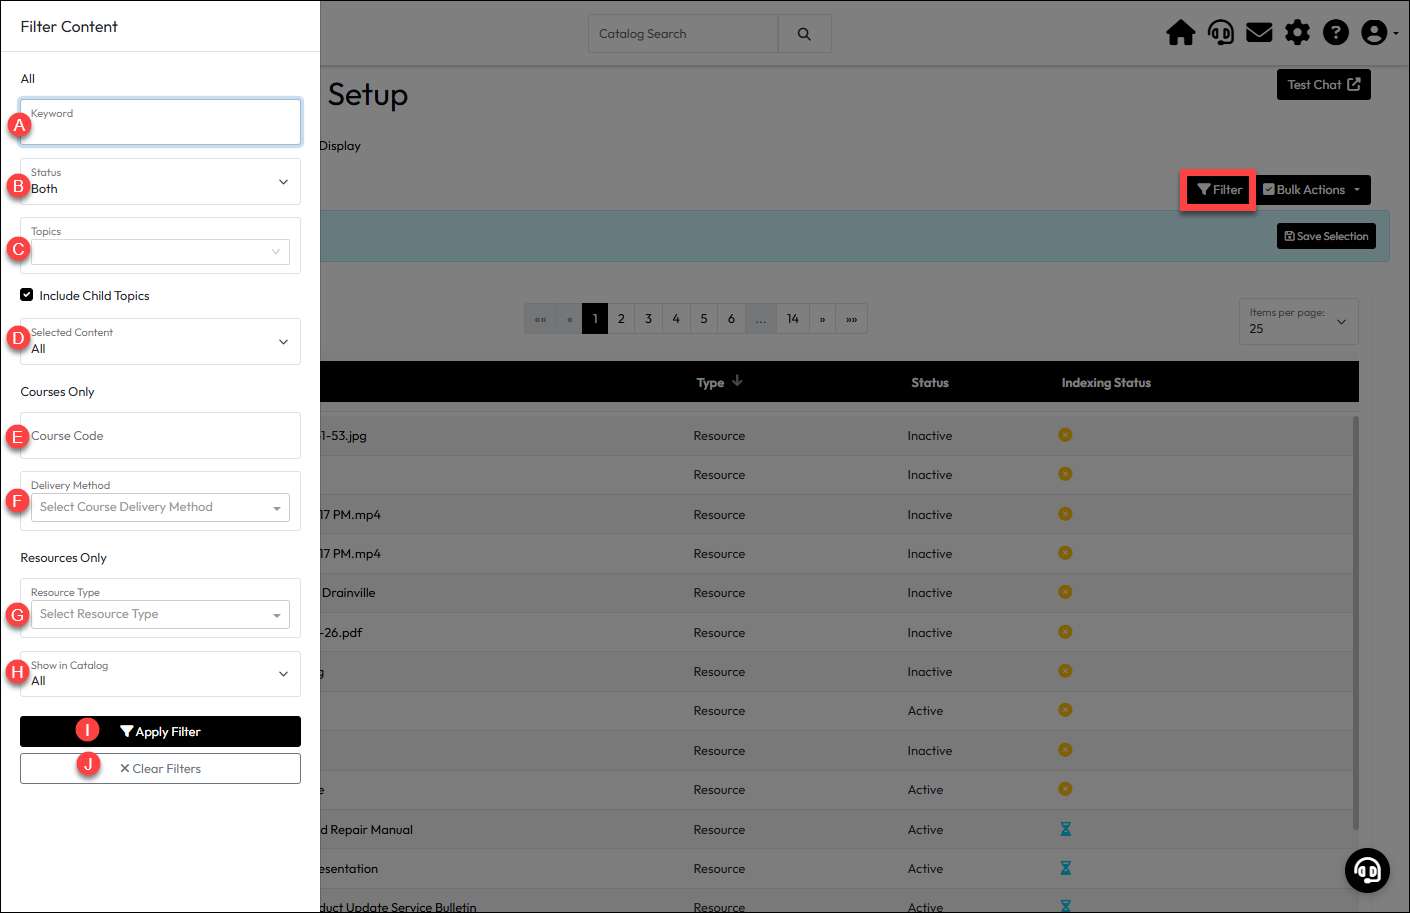
You can filter the items in the content list to make it easier to find and take action on the items displayed. They are separated into sections based on whether they filter all items, or specifically courses or resources.
  1. From the Administration page, select Site Information > Learning Assistant.
  2. Click Filter in the upper right corner to expand the filtering slide-in.
  3. Use the filters shown below, as needed, to construct your preferred results list.
    1. Keyword: All Section. Filter by keywords entered here that will look for courses and resources containing those words in their code, name, and description.
    2. Status: All Section. Filter for items that are Active, Inactive, or Both
    3. Topics: All Section. Filter based on specific topics tied to the course or resource.
      Select the Include Child Topics check-box if you want any parent level topics selected to also pull the items with child topics relevant to that parent.
    4. Selected ContentAll Section. Use to filter by content that has already been “selected” (indexed or attempted to have been indexed) in the first column (Yes) or not selected (No). 
    5. Course Code: Courses Only section. Enter a specific Course Code. Only one can be used at a time and must be manually entered.
    6. Delivery Method: Courses Only section. Select one or more delivery methods to filter.
    7. Resource TypeResources Only section. Select the type of resource to filter.
    8. Show in CatalogResources Only section. Select Yes to show resources that are displayed in the Catalog and No to display those which are not. All to get both settings. 
  4. Click Apply Filter (I) to execute the filters selected. Click Clear Filters to start over.

Content Indexing or Index Removal

Indexing content means including it in the data that trains the chatbot to support people’s questions and helping it find the answers more quickly.  To include or exclude content from the Learning Assistant’s knowledge base:

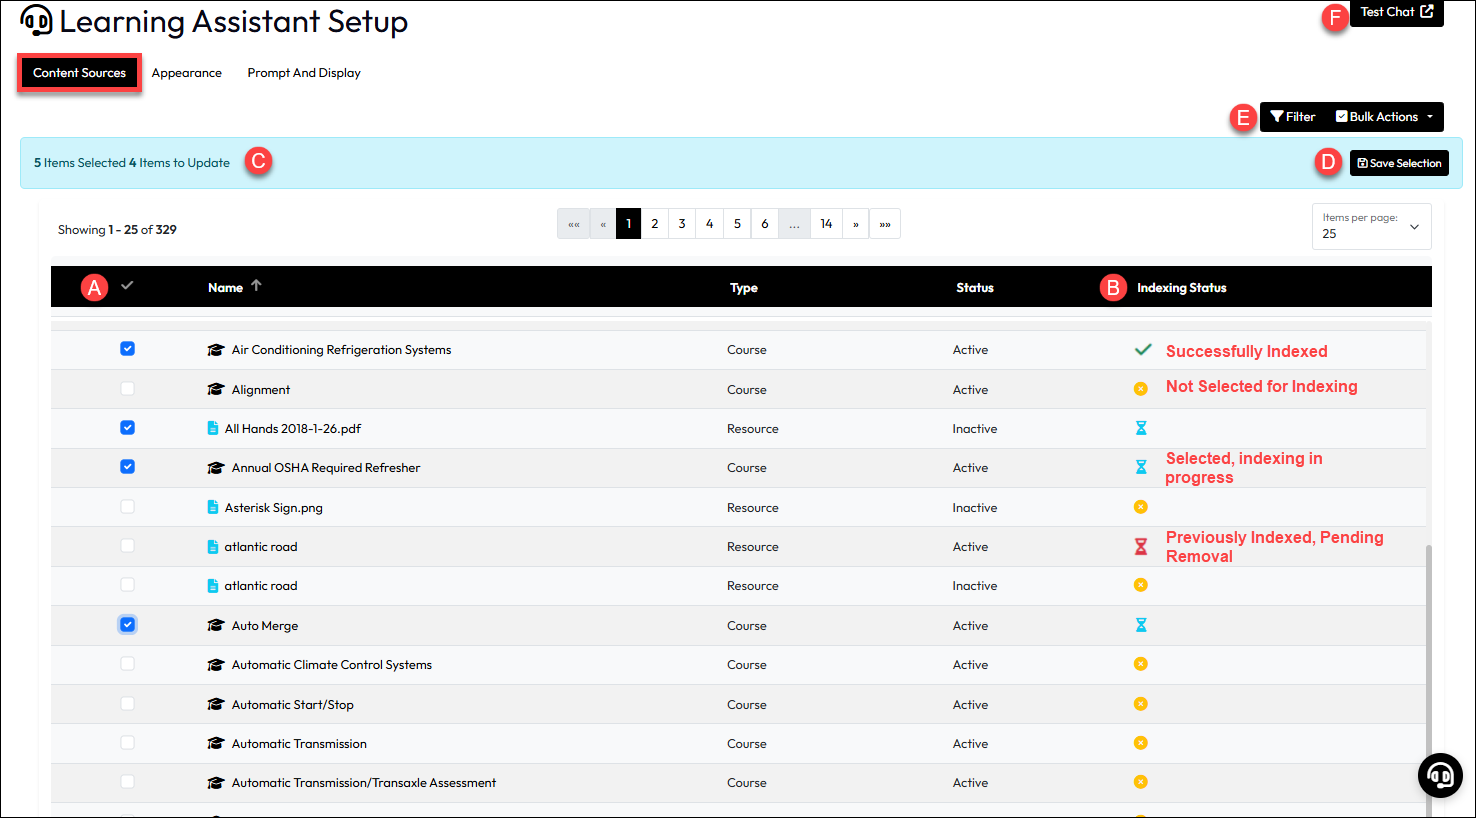
  1. In the full or filtered list of content check or uncheck a box (A) to the left of the entries you want to include or exclude. The Indexing Status (B) will display a blue hourglass to indicate “Pending Indexing” for items you checked. It will show a red hourglass under Indexing Status to indicate “Pending Index Removal”.
  2. After items are selected or de-selected, you can review the Items to Update (C) status in the blue bar at the top. This shows the number of items “selected” in the check box column and the number of items “To Update”. Numbers may vary because items to remove from indexing are not “checked”.
  3. To process the updates, click Save Selection (D) from the blue bar. As processing takes place, items will update under Indexing Status. 

At any point, you can use the Test Chat button to jump out to the Learning Assistant page your users would see and test questions to see how the results appear. If necessary to improve the results, you can update the content with better descriptions, titles, or in the case of resources, the actual content. Changes to an indexed item will cause it to update.
Appearance Tab

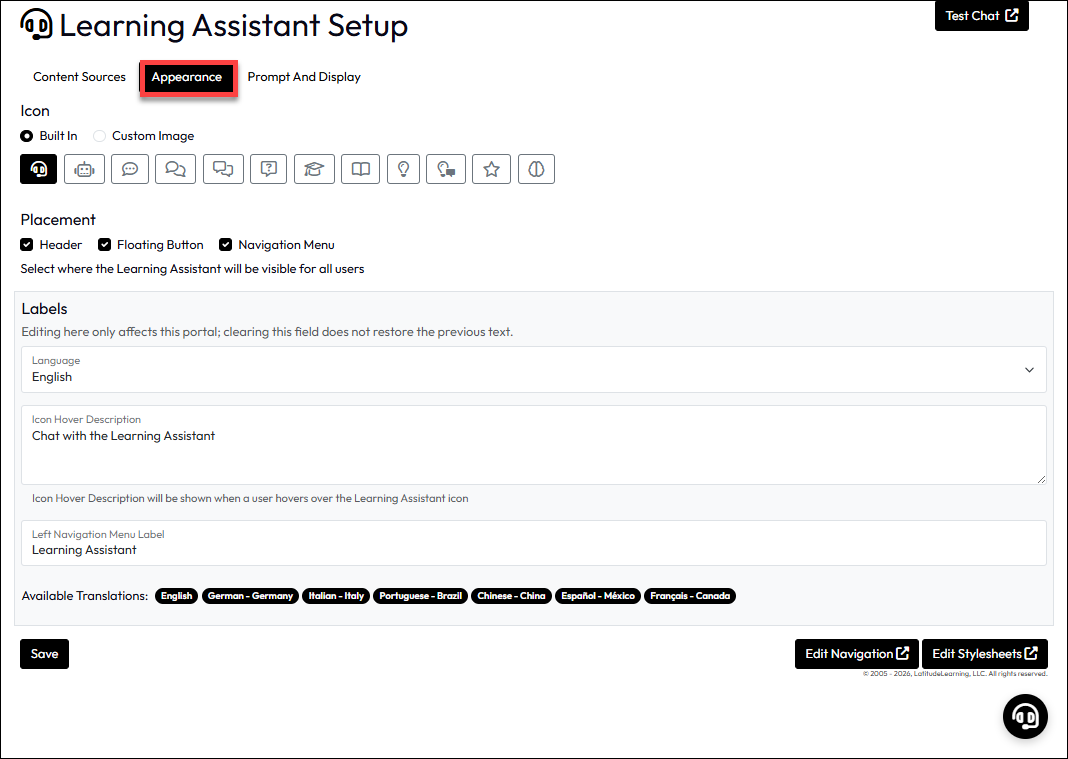
This tab contains settings and controls that allow portal administrators to customize the Learning Assistant icon  and how it is labeled.

  1. From the Administration page, select Site InformationLearning Assistant.
  2. In the Icon section, select whether you want to use a Built In icon or your own Custom Image.
    • If you select Built In, choose the icon you want to use from those shown.
    • If you select Custom Image, from the Upload Icon Image box, drag and drop the image file or use Browse Files to select one.

Note: Upload an icon (.SVG or .PNG, max 500 KB, recommended 64×64 px, transparent background preferred). The floating button defaults to a blue background, so dark icons may need a full-color version with a round transparent background, or a stylesheet override on lms-learning-assistant-float-btn (or its inner img). For SVGs, a CSS filter in your stylesheet can override the color, but it is limited to one color — this tool can help generate the right filter value.

  1. Under Placement, select one or more options from those shown. This determines where the Learning Assistant will be available for all users.
    • Header – will appear in the header with other buttons.
    • Floating Button – will appear in the bottom right corner, ever visible regardless of the page the person is on.
    • Navigation Menu – will update the icon used for Learning Assistant on the left-side Navigation menu.
  2. Under Labels, make changes to various texts that appear to Learning Assistant users.
    Note: Editing the texts here is portal-wide. Clearing the field does not restore the previous text and it will need to be re-entered.
    • Language: By default, English is selected. An English translation is required before additional languages can be added.
      To add a new translation, select the desired language here, then provide and Save the translations in the fields below.
    • Icon Hover Description: This is the text shown when hovering over the Learning Assistant icon.
    • Left Navigation Menu Label: This is the text displayed next to the icon in the Navigation menu.
    • Available Translations: display only field indicating which languages are translated for the currently set Hover Description and Navigation Menu Label.
  3. When finished, click Save.

There are also quick links to Edit Navigation and Edit Stylesheets at the bottom right of the Appearance tab.
Prompts and Display Tab

This tab contains settings and controls that allow portal administrators to customize the Learning Assistant behavior was users interact with it.
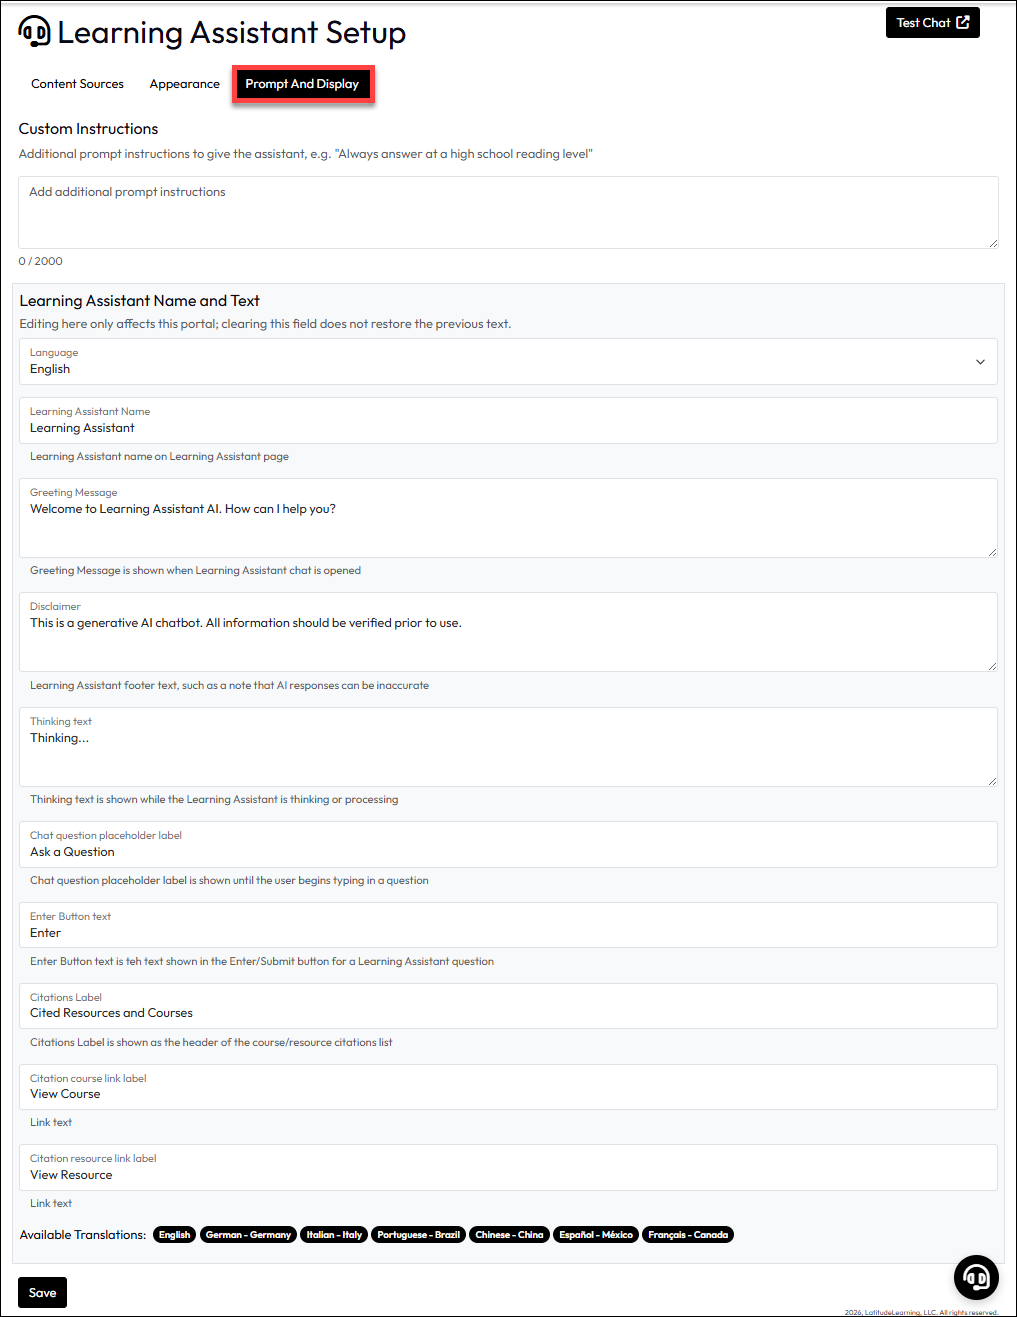
  1. Under Custom Instructions, optionally enter any prompts and instructions you would like the AI Assistant to employ when answering questions asked of it by users. Some examples of this might be:
    “Always answer at an 8th grade reading level”
    “Avoid inferences and generation of answers that are not specified or contained within the source materials.”
  2. Under Conversation Text, update the various texts used by the Learning Assistant while interacting with users.
    Note: Editing the texts here is portal-wide. Clearing the field does not restore the previous text and it will need to be re-entered.
    • Language: By default, English is selected. An English translation is required before additional languages can be added.
      To add a new translation, select the desired language here, then provide and Save the translations in the fields below.
    • Learning Assistant Name: This will show as the name of the Learning Assistant Page
    • Greeting Message: The Greeting Message is shown when Learning Assistant chat is opened.
    • Disclaimer: This is the Learning Assistant footer text and should be used to note that AI responses can be inaccurate.
    • Thinking Text: Thinking text is shown as the Learning Assistant is processing and generating an answer.
    • Chat Question Placeholder Label: Chat question placeholder label is shown until the user begins typing in a question
    • Enter Button Text: Enter Button text is the text shown in the Enter/Submit button for a Learning Assistant question.
    • Citations Label: The main label identifying the list of Courses and Resources used in developing the response to the user’s question.
    • Citation Course Link Label: The label used to identify the link used to access the course cited in the Citations section.
    • Citation Resource Link Label: The label used to identify the link used to access the resource cited in the Citations section.
    • Available Translations: Display only field indicating which languages are translated for the currently set texts.

Enable the Learning Assistant in Your Portal

Displaying the Learning Assistant to your learners is simple, once you have some content indexed to give them results to common questions or information queries they might pose to the chatbot. Remember, while setting up your indexed content, you can use the Test Chat button on the Learning Assistant Content page to access the hidden Learning Assistant page your learners would use. This allows you to test searches and questions they might, ensuring that they have a good experience when you do enable the tool on your Navigation menu.

When you are ready to enable the Learning Assistant for your learners:
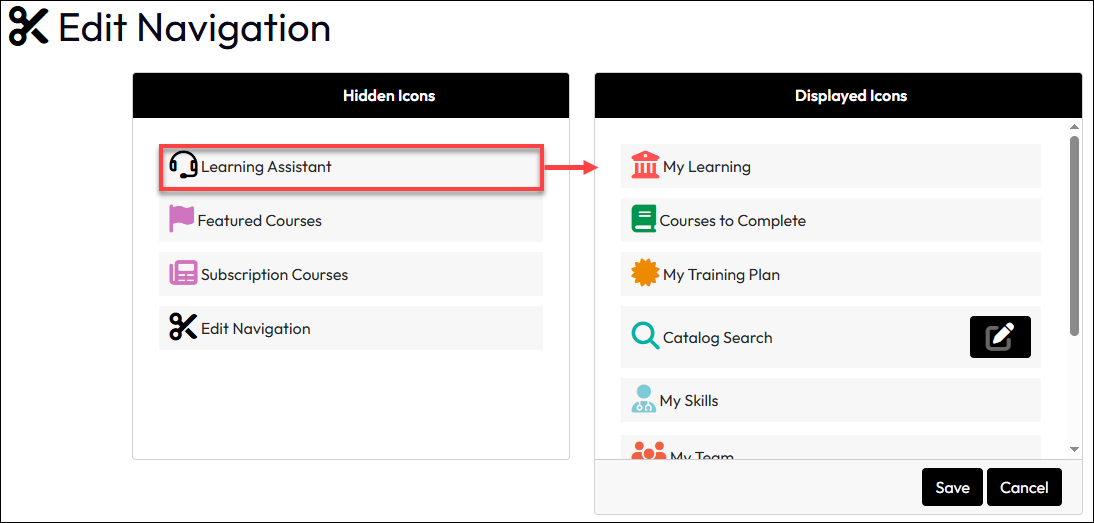
  1.  From the Administration page, select Site Management > Navigation Setup.
  2. Find Learning Assistant in the Hidden Icons column, then drag it to the Displayed Items column. 
  3. Drag and drop it into the display order you want it to appear on the Navigation menu. 
  4. Click Save. It will then be available to your learners on the Navigation menu.