Self-Study Courses

Self-Study courses allow learners to complete training independently, at their own pace, without attending an instructor-led session. These courses support a variety of training needs, including policy reviews, on-the-job training, product education, and AI-assisted learning.
LatitudeLearning offers two Self-Study course formats to accommodate different training requirements:
  • Single-Content: Uses a single primary learning resource and supports traditional Self-Study activities, such as reviewing documents, completing training tasks, or accessing online content.
  • Lesson-Based: Organizes video training into multiple lessons within a single course. Administrators can provide lesson-specific instructions, control lesson sequencing, and configure completion requirements.
Both formats allow administrators to deliver self-paced training while selecting the structure and completion method that best fits their learning objectives.

Feature Overview and Requirements

Depending on the nature of training materials, Portal Administrators can use this flexible course delivery method to accomplish multiple business goals:

  • Upload a resource to the LMS, then use it to create launchable content in the course.
  • Integrate content hosted on a third-party site, such as Vimeo.com or YouTube.com, to create video-based courses
  • Attach multiple training resources to a single course
  • Use it to provide on-the-job training checklists or requirements
  • Use the AI Course Tools feature to augment the self-study experience. These allow you to select and index resources for the course, then let AI generate a study guide that contains a variety of learning objects that you can edit to your needs.
Self-Study Course Formats

Self-Study courses support two formats:

  • Single-Content: Uses a single primary learning resource and follows the standard Self-Study course configuration.

  • Lesson-Based: Organizes video content into multiple lessons, with options for lesson sequencing, instructions, translations, and completion verification. (please note, some updates will be applicable 11.22.26)

Lesson-Based Content Requirements

Each lesson must use one of the following resource types:

  • Presentation: A video created using the LatitudeLearning Presentation resource type.

  • File: An MP4 video uploaded as a File resource.

Other file formats are not supported as Lesson-Based course content.

Lesson-Based courses also support the Lesson Completion Required completion type, allowing course completion to be based on lesson completion.

It is important to note that because Self-Study courses are not designed for use with eLearning (SCORM) content, a student’s course progress, completion, and scoring is not automatically recorded in LMS training history. Instead, these courses can be set up to allow different methods of certifying course completion:

  • Self Verification: The student is able to confirm their own completion.
  • Manager Verification: The student submits a request for their manager to approve their completion.
  • Admin Verification: The student submits a request for someone with an Administrator or Portal Administrator role to approve their completion. Portal administrators or those with access to search and edit user training history will also still be able to manually set the transcript status using the Edit Transcript option.  

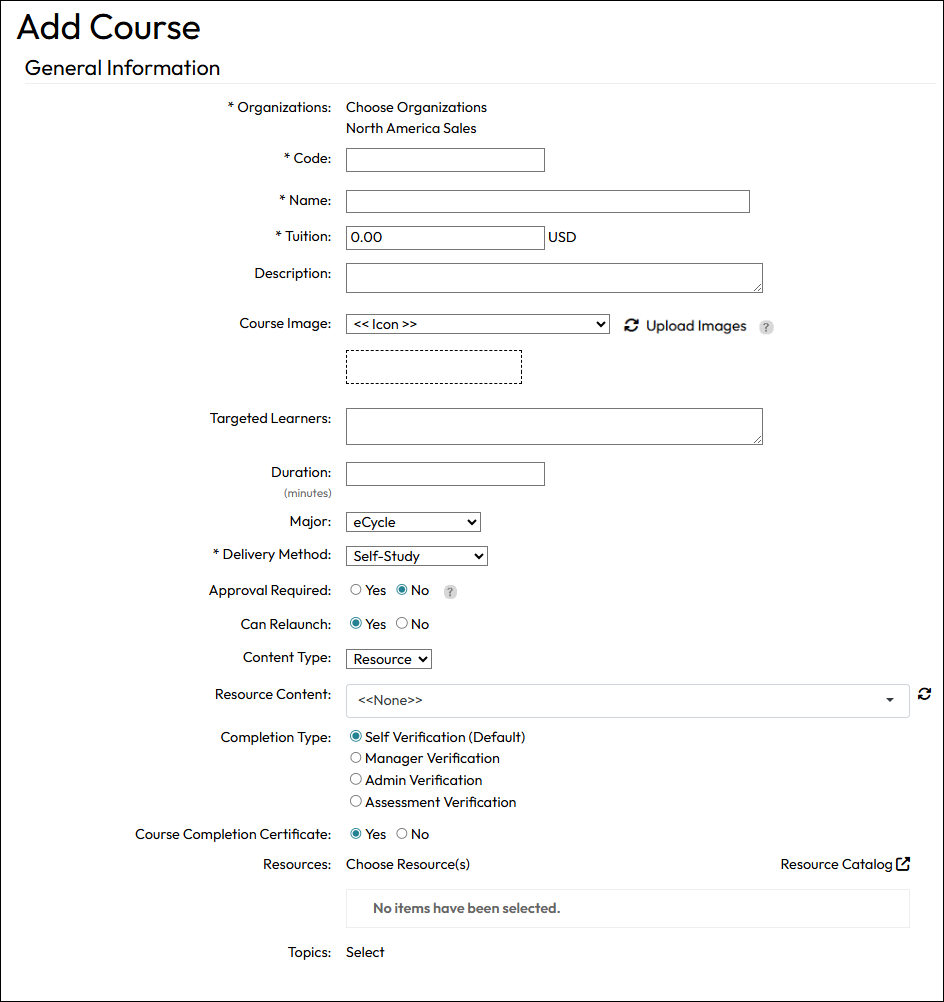
This document assumes a basic knowledge of the common elements of adding a new course and will touch on elements that are particular to the Self-study delivery method. 

Step by Step Procedure and Field Description

Add Resources as Content

Portal Administrators can build a resource catalog customized to their training needs by uploading content (PDFs, Word, Excel, MP4, or WAV files, etc.) to the LMS and/or providing links to objects such as websites, videos, and more. Resource content can vary from a general LMS user guide to study material associated with a particular training topic.  If you are using Resources as content, you can create them before adding the Self Study course or add them later, then modify the course to associate the resources. Use of resources, however, is not required in order to use Self-Study courses.

Add a Self-Study Course

To add a Self-Study course, select Self-Study as the Delivery Method. This displays the Course Format field, where you can choose between Single-Content and Lesson-Based.

  • Single-Content: Select this format to create a course using the standard Self-Study configuration. The field descriptions below explain how to configure Single-Content courses.

  • Lesson-Based: Select this format to organize video training into multiple lessons. After creating the course, administrators can configure lesson order, instructions, translations, and video resources.

For detailed instructions on creating and managing lessons, see the Lesson-Based Self-Study Courses support article.

Single-Content Course Field Descriptions

  • Description: Use this field to describe the course, including any instructions for the user, or to describe study tasks that may not be associated with launchable content. Some possible uses:
    • Track on-the-job training training activities as a list of tasks (possibly supported by a checklist in the Resources list).
    • Instruct the user to refer to downloadable resources in the Resources list.
    • Provide instructions on actions to take after completing the content.
  • Content Type: Select Resource or Link from the drop-down list if you are using launchable content. Content provided in this manner will provide the user a Launch button. It is not required to use this option, but when using it, the selected Resource or Link will launch or be available for download when the student launches the course.
    • If you select Resource, you must use the Resource Content drop-down list to select the relevant resource. Launch behavior will vary between online (Open) and offline (Download) depending on the file type selected.
    • If you select Link, you must provide a complete and valid URL to the online content.
    • If you leave this blank, you can use the AI Tools discussed below to generate content such as a study guide or an assessment. Upon generation, these tools are added to the Resource library. You could return to this field after that to pull in the AI-generated resource as the content to launch.
  • Completion Type: Determines how the course completion will be set for the course.
    • Self Verification (default): Select this option to allow the student to self-certify their own completion.
    • Manager Verification: Select this option to trigger a process in which a manager can verify the completion of the self-study content. The student initiates the process by clicking the Request Verification button on the course slide-in page when they have finished the course requirements. This triggers an approval workflow for managers which can be processed like other LMS approval requirements from the Approvals page or from My Team – Approvals.
    • Admin Verification: Select this option to restrict verification to people with the roles Administrator or Portal Administrator. The process works like the Manager-certified option except includes only Administrators and Portal Administrators.
    • Assessment Verification: This option is only available if you use AI Tools to generate an Assessment within the self-study course and it is selected to be displayed. Verification of completion will be decided by the results of the assessment. The assessment is based off the indexed materials on the AI Tools tab after the course is created. The assessment is generated by Latitude’s original assessment engine, but is contained to the Self Study. Editing the quiz and the navigation by the learner will look familiar for those users already experienced in the standalone Assessment delivery method courses.
    • Lesson Completion Required: Available for Lesson-Based Self-Study courses. Select this option to require learners to complete the lessons in the course to satisfy the course completion requirement.
  • Resources: Use Choose Resources(s) to attach one or more Resources to the course. Resources added in this manner do not launch and users must navigate to the Course Slide-in to open and/or download the resource.

You can modify Resources assigned to the course, as described above, by using the Administration menu > Search Courses option, opening the Course Details page, and editing the course record on the “General” tab. 

Using AI Tools to Develop Content For Self-Study Courses

After saving your course, an AI tools tab will be included with the other standard tabs. This tab contains a content generation feature currently available only for courses using the Self-Study delivery method. It provides portal administrators with an option to create and index a body of knowledge about the course based on selected resources, then generate  AI-based, customizable learning objects including:

  • A Study Guide for the course which includes overviews, learning objectives, practice quiz questions, flash cards, and more.
  • An AI course Coach chatbot to answer learner questions about the content.
  • An Assessment for use in validating student success using a score instead of the self-, manager-, and administrator-verified options available.

The generated content for the study guide and assessment is fully editable. Administrators can determine whether or not these AI content objects or the resources associated with the course appear in the course window when a student launches a self-study course.

This is an optional tool that can help make Self-study courses more robust and more meaningful to learners.

Learn how to use this feature by reviewing the page Managing AI Tools for Courses.

Enrolling In and Launching the Course 

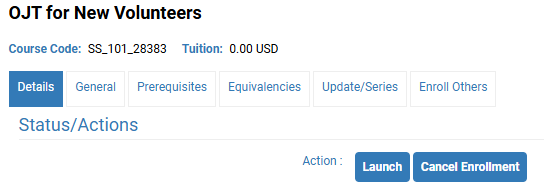
A student can enroll in the new course as they would any other type of course. Once enrolled, how they view the content depends upon the type of content provided. For courses with Resources or Links specified as Content Types, enrolled students can view or download the training material (based on file type).

From the Course Search page:

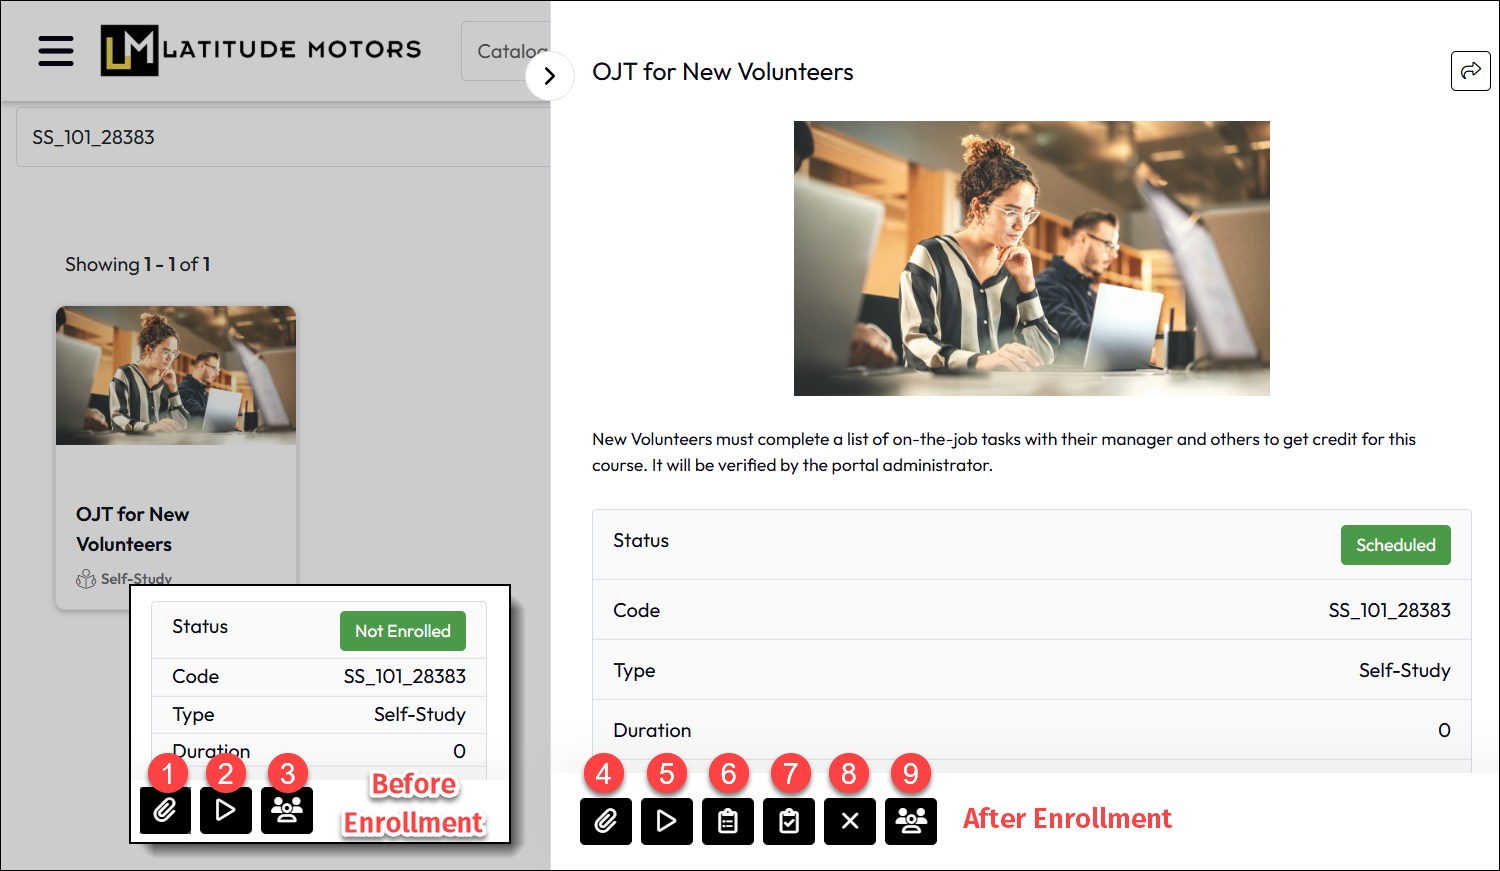
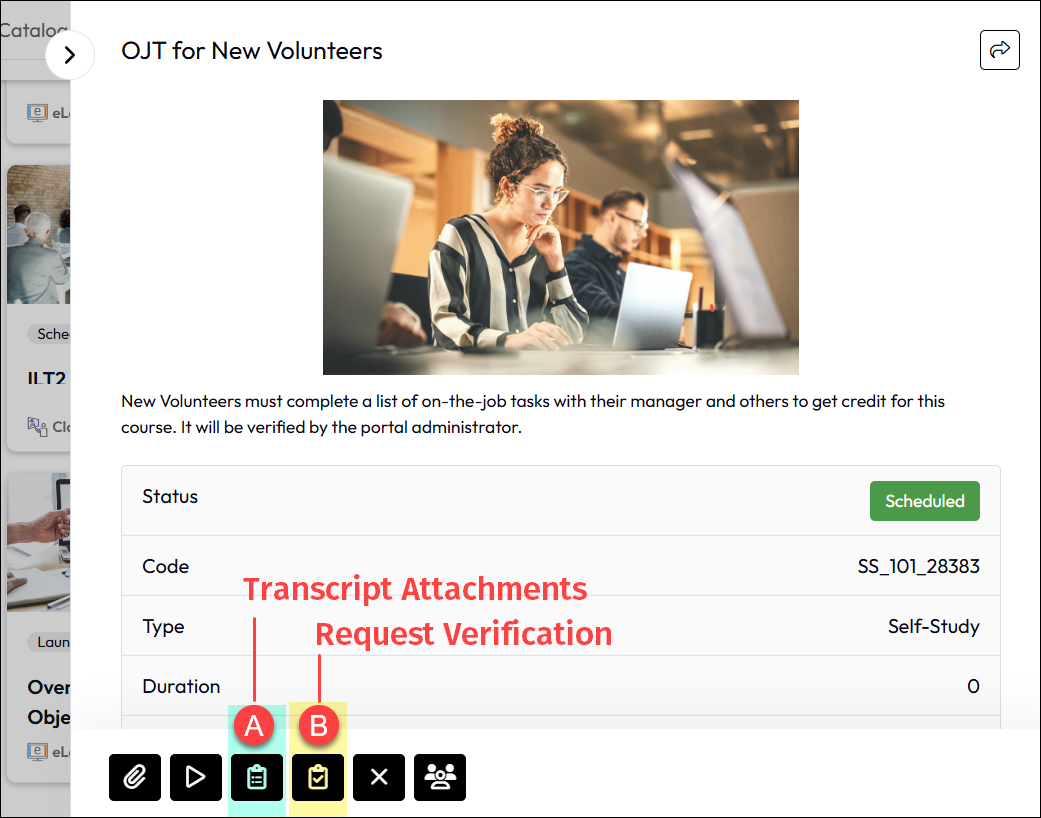
When a student clicks on a Self-Study course from many responsive user interface pages (e.g. Courses to Complete, My Learning, Course Search) a Course Details Slide-in appears. Buttons shown initially depend upon how the content is set up in the course and whether the user is already enrolled, as shown by the buttons above. 
Prior to enrollment, users may see these options. Numbers refer to the image numbers.

  1. For courses with Resources there is a View Resources button which opens an additional slide-in with launch/download actions on the resource list.
  2. For Resources or Links identified in the Content Type and related target fields, there will be a Launch Content button that launches or downloads the content. Also, if the student is not enrolled, it will process the enrollment. For Self Study courses that employ content solely in the Description or in the Resource Attachments list, the same button enrolls the user but does not open any content. Users must review any instructions provided in the Description and click to download any listed Resources in order to view the coursework. 
  3. Enroll Others appears for users who are managers or administrators.

After enrollment, action buttons change. These buttons may display, as shown in the image above based on how the course is configured, especially the verification method selected.

  1. View Resources (same as 1).
  2. Launch (same as 2).
  3. Transcript Attachments: Allows a Student to upload attachments supporting their completion request. This is only available under Manager- and Admin-Verification. Once a user submits their manager completion request, the student option to attach additional files is disabled. These documents are available to the manager (or Administrators) and the student for later review and will also be stored on the user’s Training History for the transcript.
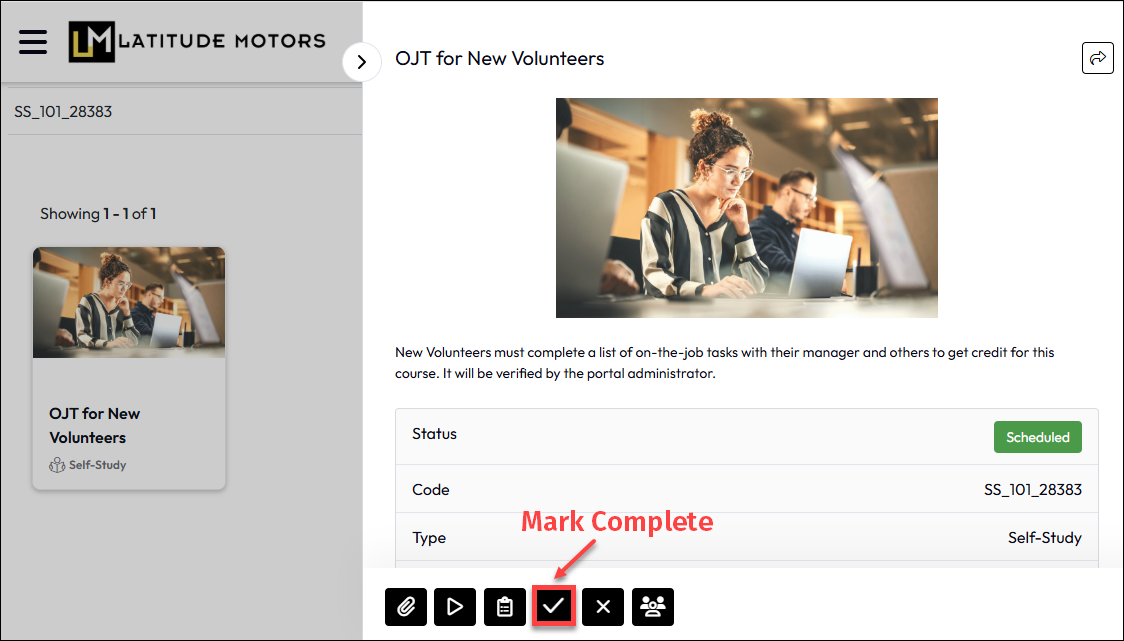
  4. Request Verification: When a student is ready for the manager to review their completion progress for final approval, click this button to trigger the manager notification process. This is only available under Manager- and Administrator-verified completion. When Self-Certification is enabled, this button is replaced by Mark Complete, represented by a check mark.
  5. Cancel: Click to cancel the enrollment.
  6. Enroll Others (same as 3)

Student Self-Certified Completion

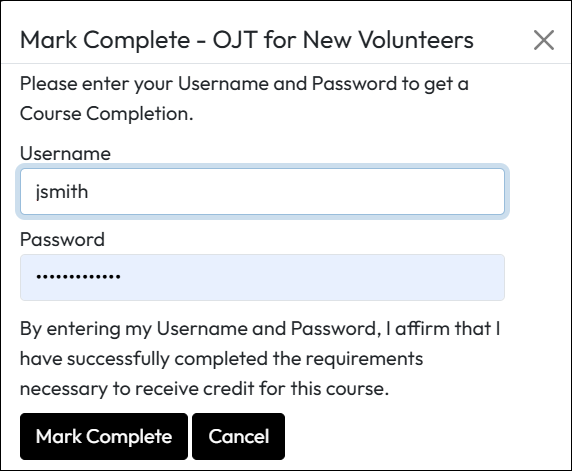
If Self Verification is enabled, as it is by default, the student can click Mark Complete (check mark icon) from the Course Details Slide-in on any relevant page. This requires the user to confirm their completion by submitting their username and password. Upon submission, it creates a timestamp with the logged-in user’s account information, to indicate they agree the coursework is completed.


This requires the user to confirm their completion by submitting their username and password. Upon submission, it creates a timestamp with the logged-in user’s account information to indicate they agree the coursework is completed.


Manager- and Adminstrator-Based Verification

If Manager- OR Administrator- Verification is enabled, prior to requesting verification, if the learning activities in the course require documentation, the student can upload files to the transcript using the Transcript Attachments button designated by (A) below. When the student has completed their course work and is ready to submit it for manager (or administrator) for review and approval, they must click the Request Verification button designated (B) below. This starts the approval and confirmation process and locks the student’s ability to add more attachments.


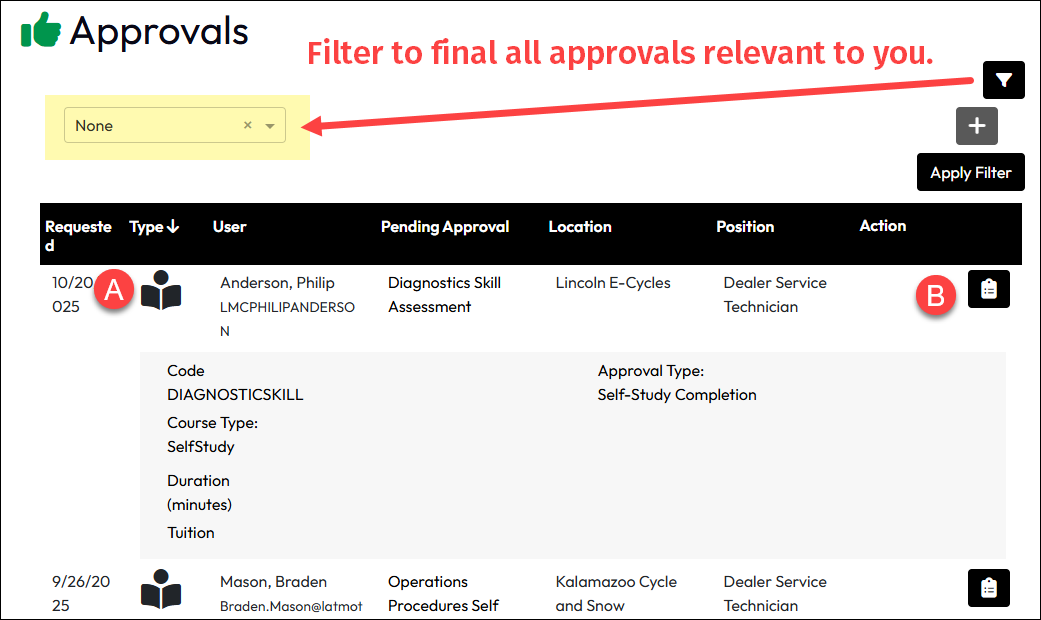
For Administrator Verification approvals, there are no email notifications sent. Under Manager Verification, the manager will receive a Manager – Self-Study Certification Completion Notification indicating there is an self-study approval requirement available for review. Managers and Administrators can find these approval requests on the Approvals page and the My Team – Approvals tab. From either of those pages, the approval options are shown below.

(A) Type:  Icon expands to show more details about the approval requirement and the course.
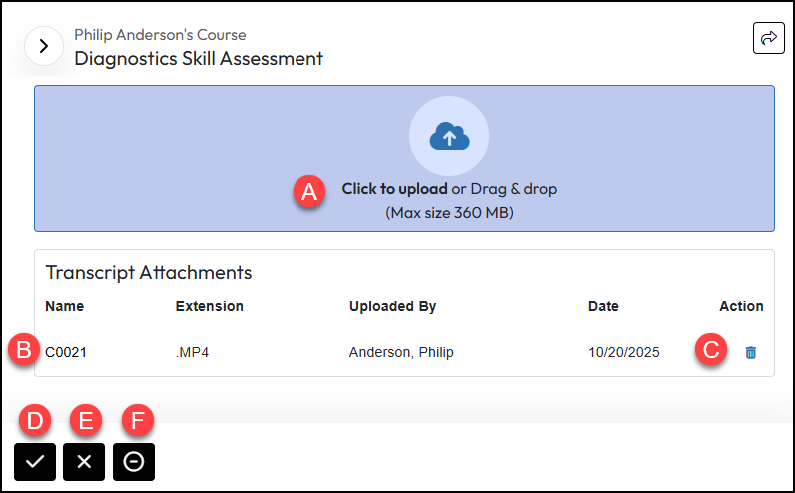
(B) Transcript Attachments: Allows the managers or administrators to view any attachments added by the student and add attachments of their own. Once approved, the manager is no longer able to add new attachments. This button appears even if no transcripts are uploaded. They can access buttons for approval or denial from the Transcript attachment page, or by clicking the Course Name link in the Pending Approval column. An example of the Transcript Attachments page is shown below.
(A) Attachment Upload Area: Upload files to the transcript by browsing or drag and drop.
(B) Transcript Attachments Area: Attachments that the studen, manager, or administrator have already loaded to the transcript. Click the file Name link to download.
(C) Delete: Click to delete a specific attachment.
(D) Approve: Sets the transcript status to Pass.
(E) Deny: Denies the verification of completion. This triggers a notification to the student about the denial which may require follow-up with the manager to resolve any outstanding requirements.
(F) Fail: Sets the transcript status to Fail.